I’m sure you’ve heard this acronym before. It’s commonly used in conjunction with SEO. And the dreaded word strategy. As in, “What’s your SEO/SEM strategy?”
While similar, SEO and SEM are different in one key way: advertising dollars. SEM stands for Search Engine Marketing, whereas SEO stands for Search Engine Optimization. Essentially, if you’re running an SEM campaign, you’re buying search ads on either Bing or Google Ads (formerly AdWords).
This post is going to focus on SEM and help you build a solid strategy. As with all strategies, there are some best practices to keep in mind. Here’s a six-step checklist to launch your very own search engine marketing campaign.
SEM Best Practices Checklist
Before you dive headfirst into a pay-per-click (PPC) campaign, make sure to get your ducks in a row. Unless you prefer wasting precious ad dollars? If not, keep reading.
Step 1: Outline Your Goal(s) & Budget
As the old adage goes, “start with the end in mind.” Before doing anything else, set a goal for your SEM efforts. The goal will determine tactics. Here are some examples of goals:
- Generate new leads for a product line
- Sell tickets for an event
- Get users to engage with a particular piece of content
Using those examples, you can outline what specific actions on your website would meet the criteria. For example, let’s say your goal is to generate new leads for a product line. The website action for that goal could be a form fill on a page for that product.
For selling tickets, the action would be views of the thank you page users are taken to post-purchase.
Some goals, like user engagement, don’t have a page view to track. Perhaps you want users to spend a certain amount of time on a specific page, or click a button, or view X number of pages.
These goals will be the conversions to set up in Google Ads so you can see the impact search marketing has on achieving those goals.
Something else to do during this step is to identify the initial budget to allocate to search advertising. I say
Here again, the budget should be derived from the goal. Let’s say that your goal is to generate leads for a new product line. The budget should be set based on the average sale value of that product line + the lifetime value of a customer (CLV). There’s no easy way to figure out a good PPC budget, unfortunately. There’s no formula out there that will do it for you because there are too many unknown variables at play – one of them being the average CPC for the keywords to target.
Step 2: Perform Keyword Research
Once you have your goals outlined, it’s time to do a little bit of keyword research (or KTR as we like to call it). There are plenty of tools out there for this. If this is your first foray into the wide world of SEM, then I recommend the Google Keyword Planner. It is fairly intuitive to use and isn’t overloaded with data to confuse new users.
For more advanced users, I recommend Ahrefs. This is a paid service, but the level of detail it provides for every single
When doing keyword research, keep the goal in mind. You’re likely to find hundreds, if not thousands, of relevant terms for your business and industry. Knowing which ones to focus on for a PPC campaign and which ones to disregard will not only save time but also money if you never bid on those terms in the first place.
Pro-tip: Focus on buyer keywords with commercial intent.
Commercial Intent Terms vs Informational Terms
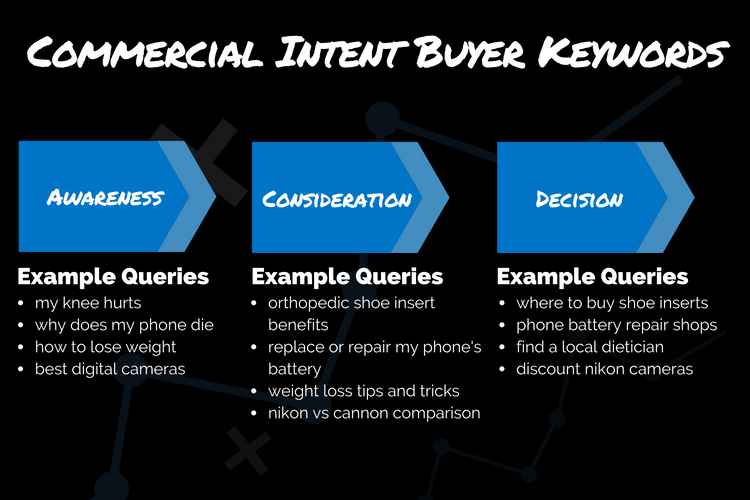
According to Backlinko, there are four types of search queries. Buy Now, Product, Informational, and Tire Kicker. The differences are fairly straightforward. Keep your focus on the Buy Now and Product terms as they are most likely to convert. It’s no coincidence that a user’s search patterns mirror their buying journey. Here’s what that might look like from how that user would search.

A PPC plan should focus on terms in the Buy Now and Product categories in the decision column. These are some words to watch for:
- buy
- price
- deal
- discount
Also, don’t shy away from brand names – especially if you carry them. People tend to be brand loyalists, so make it easy to buy those brands from you.
On the flip side, if you see any of these terms, proceed with caution:
- who …
- what …
- when …
- where …
- why …
- how …
Look familiar? The five W’s and H from grade school. Most queries using any of those terms are likely going to be informational and not transactional. Finally, there are the Tire Kicker terms to avoid at all costs:
- Free
- Download
- Cheap
But, what if your company doesn’t sell products? What if it provides a service instead? The same concepts still apply. In that case, these are some of the commercial intent terms to look for:
- vendor
- provider
- services
- repair
Step 3: Refine the Goals & Budget
Now that your keyword research is done, you’ll likely need to revisit the goals and budget identified above. If not, great! But always revisit to make sure what you wanted to go after is still feasible after looking at the research.
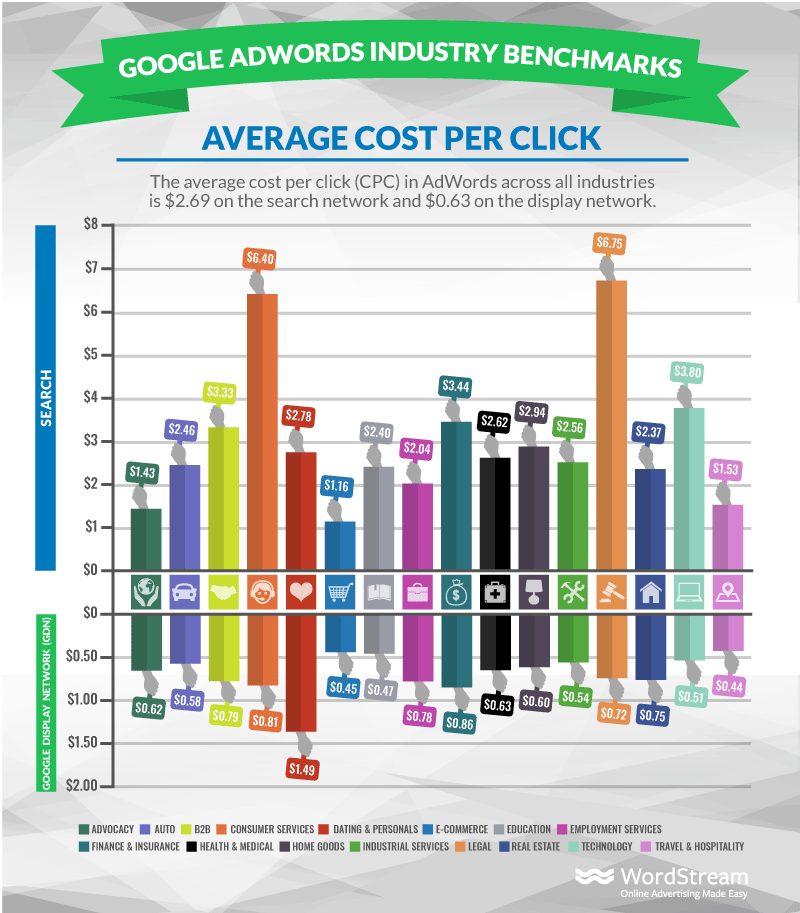
Depending on your industry, the cost you pay per click (CPC) can vary greatly. The folks at WordStream put together this handy graphic that outlines average CPCs for various industries.

If you’re in the legal services industry, expect to pay significantly more per click. This is because the competition is so high that the costs are driven up. It’s supply and demand at its finest. These numbers are just average – meaning there are plenty of terms that are much more expensive within each industry and plenty of others that are much less expensive.
If you find yourself restricted by budget – as is the case for most marketers, then make sure you target the less expensive keywords.
When trying to determine a budget, a good starting point is to be able to afford 3 to 5 clicks per day at the average CPC. Using the graphic above, a law firm could easily have a budget of $20 - $34 per day per campaign. Whereas an eCommerce store would be $3.50 - $6 per day.
Those work out to a monthly budget of $608 - $1,033 per campaign for the legal industry, and $106 - $182 per campaign for eCommerce.
Free Resource: Don’t forget to set negative keywords. If any of these words or phrases exist in a given query, your ads will not be shown. Over the years, I’ve put together a list of negative keywords that I always include for any new campaign. Go ahead and download it here. You’re welcome.
Note: That list includes job hunting focused words. If you’re running a recruitment campaign, make sure to remove any of those terms. If you do end up targeting terms that exist in the list of negatives, Google will let you know and give the option to remove the negatives that are blocking your ads from showing.
Step 4: Create Ad Groups & Ad Copy
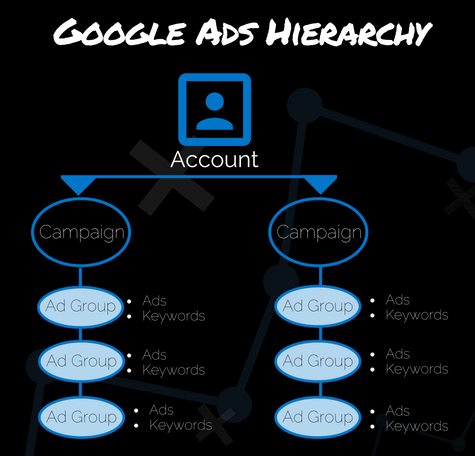
Google Ads and Bing Ads interfaces are both set up almost identically. The account hierarchy looks like this.

The Account level is where you’ll enter the billing information. The Campaign level is where budgets and targeting information are defined. There can be as many campaigns as you’d like.
Inside each campaign, there are Ad Groups. Again, you can have as many Ad Groups as needed. Each campaign should focus on a broad topic with each Ad Group containing 10-15 closely related keywords about a subset of that topic. Each Ad Group should have a few ad variations. Google’s default setting is to serve the best performing ads more often. Use this to your advantage, and tweak the ad copy to dial in on the best ads over time.
Pro-tip: One would think that more creative text ads would get more clicks. That’s not true in most cases. Google and Bing both have a feature called Quality Score. This is used when determining when or if an ad will appear for any given query and what a click will cost. There are three components of Quality Score:
- Expected Click-Through Rate (CTR)
- Ad Relevance
- Landing Page Experience
Both platforms want to serve ads that benefit searchers. Advertisers with great ads are then rewarded with better positions and lower CPCs. So, what makes a good ad? Well, it needs to be relevant to the query – meaning they use targeted keywords within the ad copy. Another part of being a good ad is what happens after a click. Google looks at the landing pages of ads and gauges the user experience – both in terms of speed and relevance to the query. Make sure landing pages use the same terms you’re targeting and offer a clear call to action.
Free Resource: Here is another resource you can use to aid in writing ad copy. It’s a template for creating campaigns,
Each headline allows up to 30 characters. The description up to 80 90 characters and the two path fields can be up to 15 characters each. The last column is to put the URL of the landing page for the corresponding ad variant.
UPDATE: Since publishing this article, Google has since increased the character limit on description fields from 80 characters to 90. They've also added the ability to have an additional headline and additional description copy. These fields will not always show up for every search, so make sure to only include non-essential information in those "bonus" fields.
The Negative Keywords tab is where you can place account wide negatives.
Step 5: Create Ad Extensions
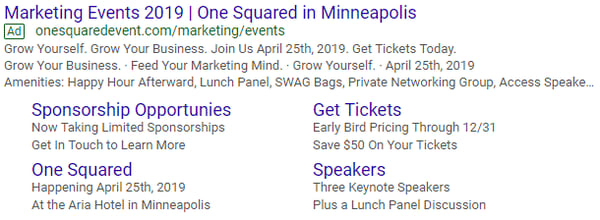
Here’s what a text
 This is an ad we’re running for our One Squared event next April. By itself, it can easily get lost in the shuffle with the rest of the ads we’re competing against. But we’re not running just the ad. By taking advantage of the plethora of ad extensions at our disposal, we can add immense value to these ads and provide multiple ways for users to engage.
 Look at how much more real estate we’re given by adding a few extensions! It’s more than 3x the size of the ad itself. Here are the most common ad extensions to choose from:
- Sitelinks – Up to four additional links with two lines of supporting copy.
- Callouts – Up to four sets of additional value copy.
- Structured Snippets – Displays at least three pieces of copy to display brands, amenities, courses, hotels, etc.
- Phone Call – Shows a phone number for users to call instead of clicking the ad.
- Location – Will display if the searcher is nearby your physical location along with links to get directions.
- Message – Similar to phone calls, except users send a text message instead.
- Price – Allows advertisers to list pricing directly within ad copy. Each price can link to its own page.
The best part about ad extensions is that a click on any of them will be charged the same as a click on the ad. It’s no more or less expensive to use ad extensions. They can be configured at the account and campaign level and added to any new ads automatically.
Step 6: Launch & Monitor
Once you’ve created campaigns, ad groups, text ads, and added keywords, turn it all on. Once you’re up and running, the work isn’t done. Far from it. Make sure to monitor performance at least once a month. Preferably weekly. During those regular check-ins, here are some areas to look at:
- Search Terms Report – shows which queries were entered that triggered your ads to appear. From this report, you can easily add words or phrases to a negative keywords list so they don’t trigger ads in the future.
- Quality Scores – The higher a quality score, the lower
CPCs will be. Each keyword has its own quality score. Focus on improving the keywords with the most impressions and clicks as they’re the ones being served more often. Incorporate those same terms into ad text and landing page copy as well. - Click-Through Rates – The average click-through rate in Google Ads is about two percent across all industries. If you see keywords with a lower-than-average CTR, consider pausing it or changing the match type to something more restrictive.
- Budgets – Give each campaign its own budget and make sure you’re getting enough bang for your buck within that campaign. Look at the metric column for “Lost Impressions (Budget)” to see the percentage of impressions you missed due to budget restrictions. Allocate more dollars to the best performing campaigns.
Those are just a few, but they’re great to start with. Once you’re more acclimated with the Google Ads interface, start looking into the more advanced features like remarketing,
Free SEM Tools & Resources
In this post, I shared two free resources. Go ahead and share them with others if you’d like. Each document is set to “Read Only” privileges, so please make a copy first or you won’t be able to make any changes to it.
Free Google Ads Template Tool